
As said by several others.. LOOKING GOOD....
Hope my welds look as nice..
Later 42rocker
Michael J's build #2
-
Michael J
Re: Michael J's build #2
Well bil, there is a super minimal bow towards the side with the welds, but it is hard to pick up even with the pictures. It shouldn't make that huge of a difference, because it is so minimal. If you places a flat edge on the bowed side, i would doubt any dip greater than a millimeter ( sorry for using my units, im no good with inchesBil wrote:Michael-Sweet!! You are moving along nicely.Good work from our youngest member.Did you do the string test-tight string down the center,top,bottom and sides/ Although I have found the eye can pick up and slight bends.It looks like you have really taken your time and spaced your welds.Keep up the good work! ---bil
Thanks guys for the complements, more pics soon! I should have updates for tomorrow
-
Lima
Re: Michael J's build #2
Michael,
Looking great and thansk for sharing.
I am Canadian but US resident. I am planning to turn one of my kits into a semi on BRP registered reciever and new shroud kit and bring it back north one of these years. Planning this 100% new receiver route like you so it can not be considered a reweld by RCMP and will hopefully make import and registration easier.
I am keen to know your details and FRT numbers stuff when you get to that point. i.e. will it be covered under the same number as the two Marstar ones or be a new flavor on the registry.
Don't sweat the manufacturing title. From what I gather, as long as you are not in it as a business to make money should be OK. I would call the firearms center and ask to speak to a tech, they can probably tell you more about what hoops to jump through as an individual. From what I gather, you give them a heads up about what your are doing then call them just before (or just after?) completion to register. They may ask you to send it to the lab for evaluation especially if it is something new that they can't verify easily. If you are on the cdn gun nutz forum, there are a few folks who have been through it a few times you can ping and can probably give you the correcct phone contacts right techs to talk to.
Cheers,
-
Michael J
Re: Michael J's build #2
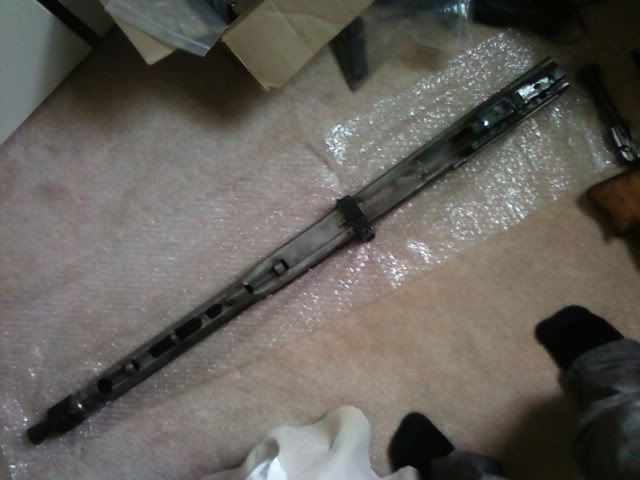
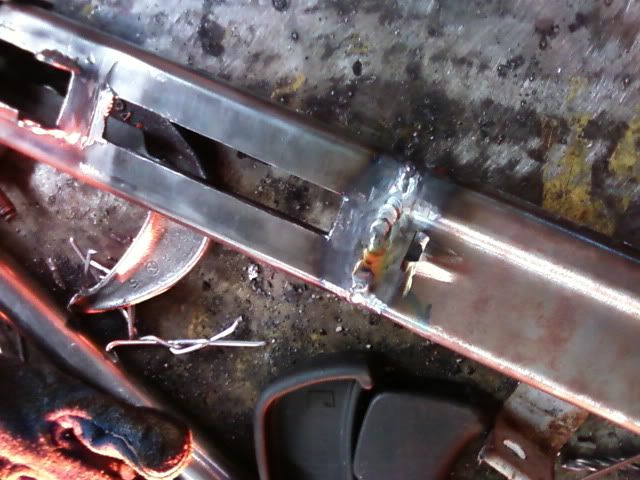
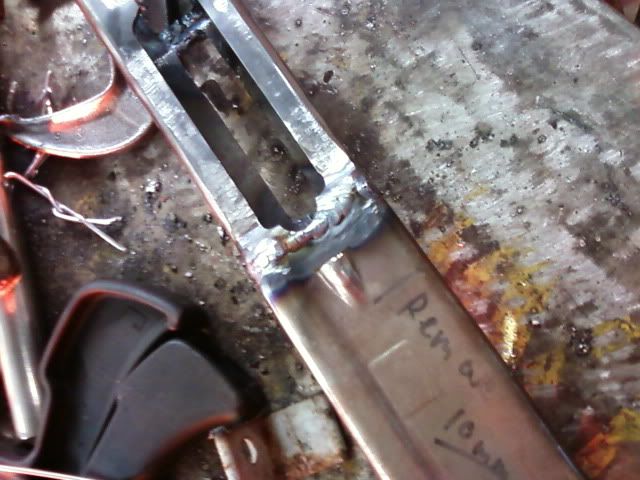
Shall resume this monday , but i got camming thing to fit all good, and machined out vent things on the side. Height is 5/8" , overall length is 1-3/4" and length of straight edge before radius is 1-1/8" for future references.
The sheet metal is hard to work with seeing as it flexes in the vice, and is super annoying! But i managed , and will clean it up monday . Topcover fits good, got to get feedtray to fit a bit closer to camming thing.
Grip base also welded in, and buffer latch stud.
The sheet metal is hard to work with seeing as it flexes in the vice, and is super annoying! But i managed , and will clean it up monday
Grip base also welded in, and buffer latch stud.
-
Michael J
Re: Michael J's build #2
http://mg42.us/download/file.php?id=9607&t=1
Oakrodent, you just saved my butt !
Holy crap, i knew the BRP stampings were out of spec width-wise, but it never occurred to me that they would be out of spec length-wise too ...
...
It turns out, i am exactly 10mm too long, which i must remove from the camming area of the barrel shroud mostly, to accurately mate the two halves. I'll probably do 8mm off the shroud, and sand off 2mm from the rear to square it up.
I'm glad i figured that out now, before having welded it!
Oakrodent, you just saved my butt
Holy crap, i knew the BRP stampings were out of spec width-wise, but it never occurred to me that they would be out of spec length-wise too
It turns out, i am exactly 10mm too long, which i must remove from the camming area of the barrel shroud mostly, to accurately mate the two halves. I'll probably do 8mm off the shroud, and sand off 2mm from the rear to square it up.
I'm glad i figured that out now, before having welded it!
-
Michael J
Re: Michael J's build #2
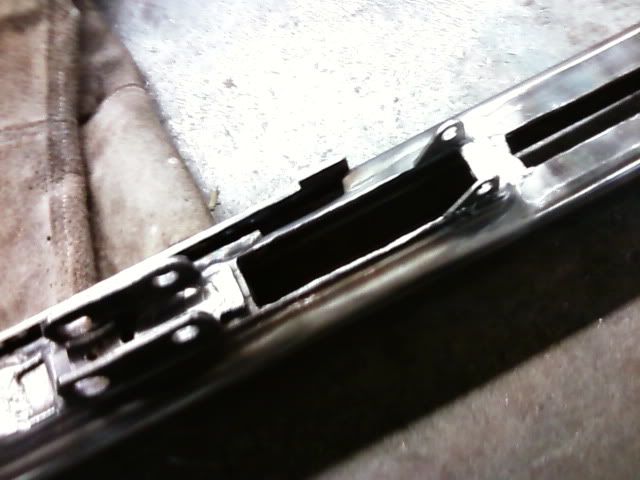
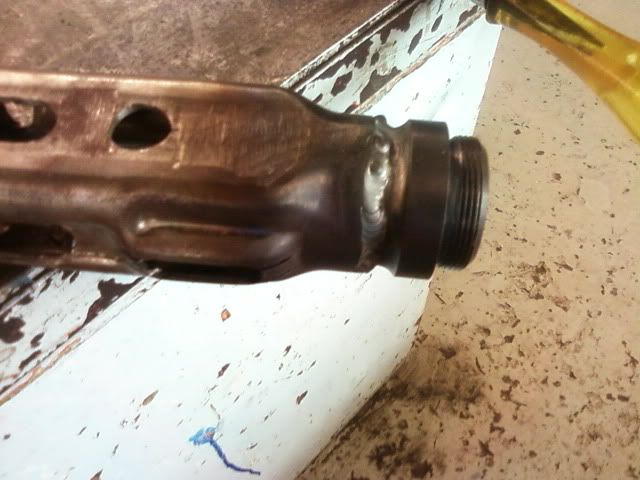
Okay , well i cut the front shroud down to correct length in the camming area, and welded her up  . I also opened up the barrel door area. I fit my trunnion thingy (im sorry , i dont know what to call it!) and it fits good. Plus i mocked up the barrel bushing, and barrel fits swell, it even goes in and out without issue!
Here's how the barrel extension and "trunnion" sit when the barrel is in its most forward position. Is this about good? I have yet to weld in my bushing, its just pressed in sort of , real snugly, but easily removed with a rubber mallet.
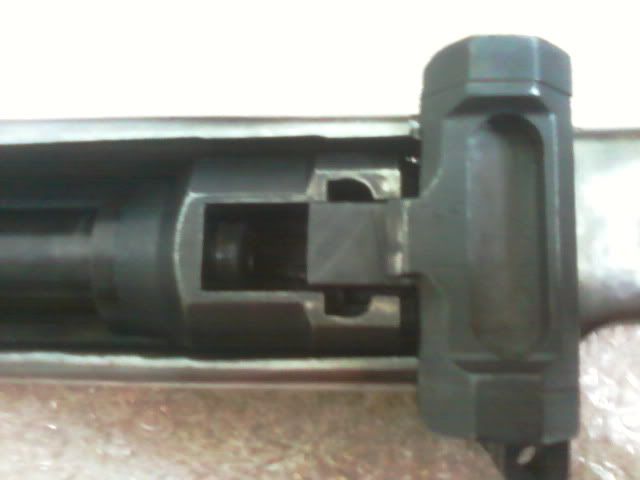
Good, bad , closer , farther?
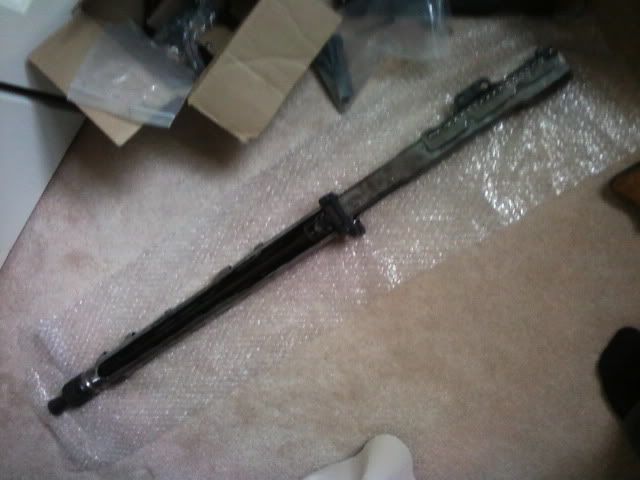
Overall here she is, did my rough grinding to remove ugly welds, and she is SOLID ! I still need to grind away protruding welds from when i mated rear and shroud , but aside from that , everything else has been ground flush.
Now my list of "to-do" stuff:
1) Get me some semi-auto bolt parts! Need the extension and firing pin setup.
2) Get a barrel door, "U" bracket, rear sight base, and those barrel door supports that are welded into the receiver. Once i get those, i needa figure out how to install em.
3) Get FAL fire control group parts to put into my fal-based grip. THEN finish up grip, and weld on grip brackets to receiver.
4) Install rails, need something to keep them in place and lined up to the bore while i tack em in place. Piece of wood maybe, make up some sort of jig? I got some friends in woodworking class that can help me with that.
5) Get front sight cut out and installed properly.
Aside from that, i just need to rivet in a bunch of junk. Once i do all this, gotta send her in for approval!
I will worry about cosmetics , refinishing wood, etc... AFTER (well IF) it gets approved . Yup, thats my game plan , no to get er all done as soon as i can!
Here's how the barrel extension and "trunnion" sit when the barrel is in its most forward position. Is this about good? I have yet to weld in my bushing, its just pressed in sort of , real snugly, but easily removed with a rubber mallet.
Good, bad , closer , farther?
Overall here she is, did my rough grinding to remove ugly welds, and she is SOLID ! I still need to grind away protruding welds from when i mated rear and shroud , but aside from that , everything else has been ground flush.
Now my list of "to-do" stuff:
1) Get me some semi-auto bolt parts! Need the extension and firing pin setup.
2) Get a barrel door, "U" bracket, rear sight base, and those barrel door supports that are welded into the receiver. Once i get those, i needa figure out how to install em.
3) Get FAL fire control group parts to put into my fal-based grip. THEN finish up grip, and weld on grip brackets to receiver.
4) Install rails, need something to keep them in place and lined up to the bore while i tack em in place. Piece of wood maybe, make up some sort of jig? I got some friends in woodworking class that can help me with that.
5) Get front sight cut out and installed properly.
Aside from that, i just need to rivet in a bunch of junk. Once i do all this, gotta send her in for approval!
I will worry about cosmetics , refinishing wood, etc... AFTER (well IF) it gets approved

-
Michael J
Re: Michael J's build #2
Thanks both of you
I'm especially joyous because my last build got to this point before i had to sell it
-
Panzercanuck
Re: Michael J's build #2
Very Nice MJ,
Nice work indeed you are definitely getting close to the end.()")
Panzercanuck
Nice work indeed you are definitely getting close to the end.
Panzercanuck
-
Michael J
Re: Michael J's build #2
This time, i will make for sure to align it perfectly before welding, and i got a little work done to the rear i should have done before welding it together last time! Here are the brackets for the pirate grip stick welded in. Grip installs quite nicely. It seems a little lopsided, or leaning to one side. I think it is because the two receiver halves
did not line up flush before welding
Also, last time i installed the topcover, the lever was actually binding with the receiver! So i machined away a fairly thin layer off of that area, hope it works good.

-
www.Prussia.us

- General

- Posts: 1060
- Joined: Sun Jan 06, 2008 7:17 pm
Re: Michael J's build #2
Michael,
You are getting so close, great pictures and updates, this thread has been really outstanding
You are getting so close, great pictures and updates, this thread has been really outstanding
“… corporations have been enthroned, and an era of corruption in high places will follow, … until all wealth is aggregated in a few hands and the Republic is destroyed.”
- Abraham Lincoln (Republican), Nov. 21, 1864
- Abraham Lincoln (Republican), Nov. 21, 1864
-
Michael J
Re: Michael J's build #2
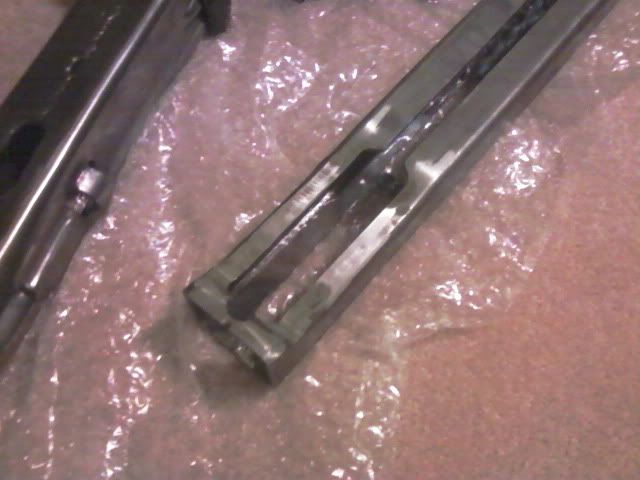
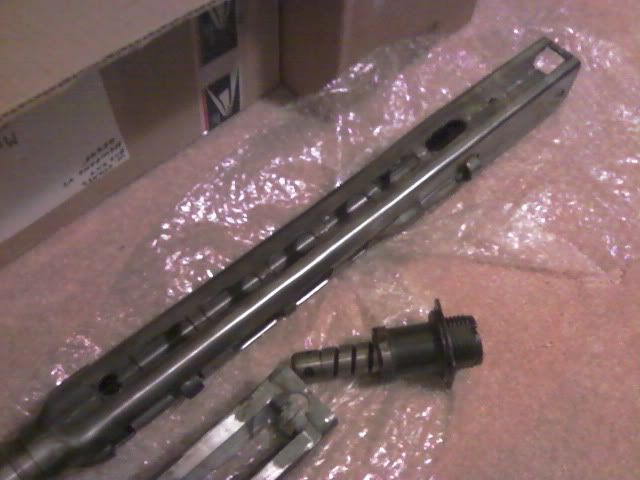
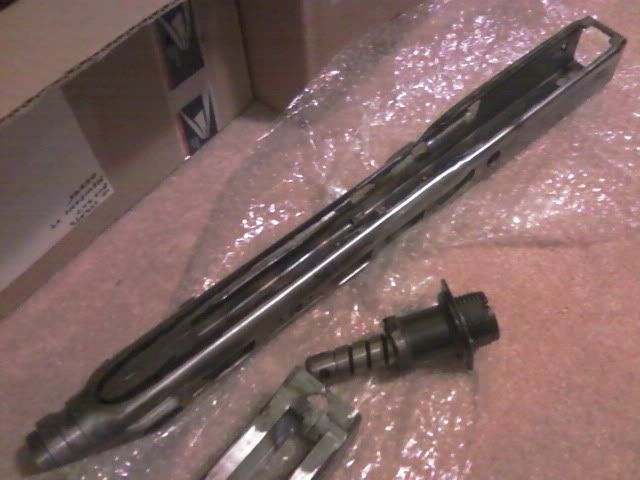
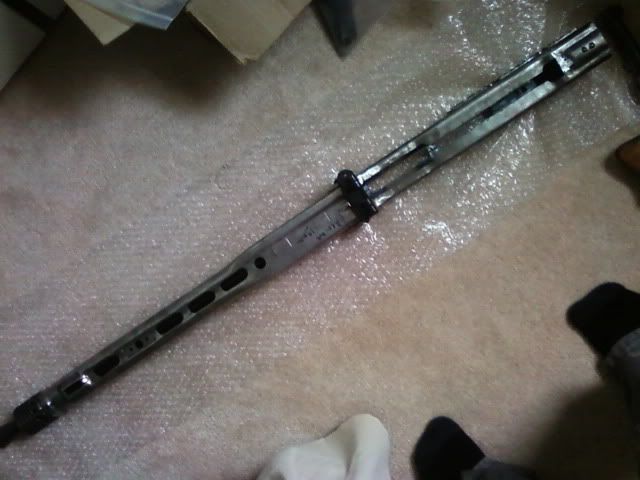
Due to that darned bowing (downwards and to the left), i was forced to cut an reweld... But i feel my extra efforts will be worth it in the long run, i am not one to cut corners ! Here we go:
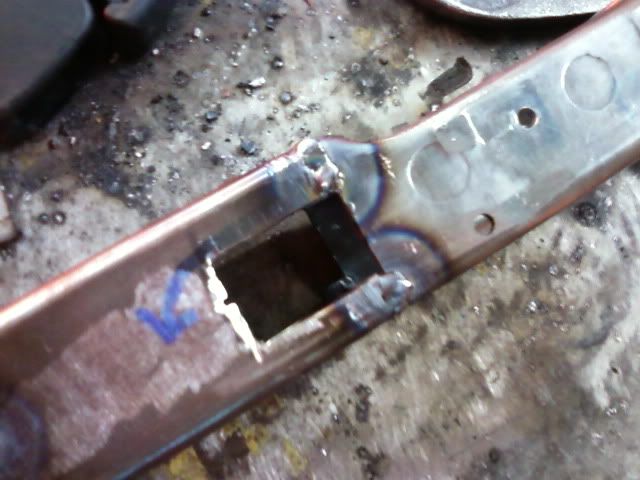
Machined away a part of the recup. to allow for installation of my FAL-based grip.
I put the bushing in "loosely" anticipating shrinkage (in regards to the barrel installing properly), but it seems it shrunk a bit more than i thought, so the barrel needs a bit of smack to install and remove. I figure the thickness needed to be removed off of the cam is about that of paper, extremely minimal, just a little filing to fit (as the barrel extension rubs on it). I do believe my barrel extension and recuperator line up quite nicely though, so i am pleased !
Had to also machine this area off a bit so as to install my feed try nice and flat on the receiver.
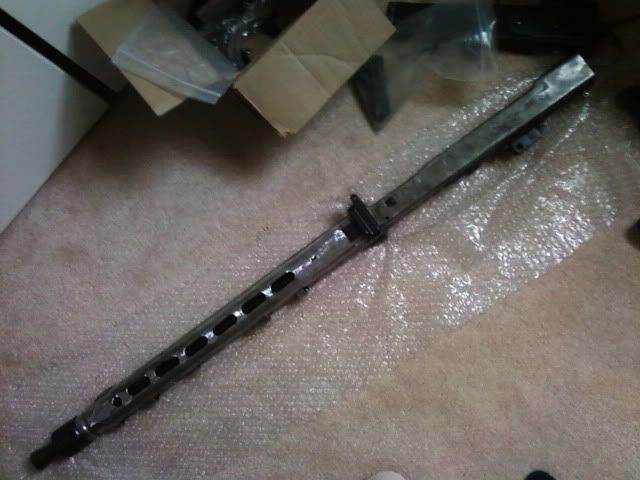
Lastly, i present to you ladies and gents, the UGLIEST D-holes you will EVER see ... Which still require a little more filing, because i completely guessed their location.
I think there was an error with the order i placed with Marstar, so i contacted the big man himself, john, and he is personally dealing with it. I know they have their ups and downs, but you got to give them props when even the biggest gun distributor in canada's owner finds time to help us "little guys" on an individual basis. I will find out what was wrong , and if the order will go through, on monday.
In the mean time, i am going to weld my rails in place, make sure they are nice and lined up with the bore, and gather up funds for the rest of the parts i need. Pretty much done the bulk of the work, all thats left is small stuff and final fitting !
Machined away a part of the recup. to allow for installation of my FAL-based grip.
I put the bushing in "loosely" anticipating shrinkage (in regards to the barrel installing properly), but it seems it shrunk a bit more than i thought, so the barrel needs a bit of smack to install and remove. I figure the thickness needed to be removed off of the cam is about that of paper, extremely minimal, just a little filing to fit (as the barrel extension rubs on it). I do believe my barrel extension and recuperator line up quite nicely though, so i am pleased
Had to also machine this area off a bit so as to install my feed try nice and flat on the receiver.
Lastly, i present to you ladies and gents, the UGLIEST D-holes you will EVER see
I think there was an error with the order i placed with Marstar, so i contacted the big man himself, john, and he is personally dealing with it. I know they have their ups and downs, but you got to give them props when even the biggest gun distributor in canada's owner finds time to help us "little guys" on an individual basis. I will find out what was wrong , and if the order will go through, on monday.
In the mean time, i am going to weld my rails in place, make sure they are nice and lined up with the bore, and gather up funds for the rest of the parts i need. Pretty much done the bulk of the work, all thats left is small stuff and final fitting
-
rocco1911
Re: Michael J's build #2
WOW holy crap Mike you really got far with this I have not been around checkin stuff for a while been a little pre ocupied as of late  But man your doin a good job congrats on this one buddy...
-
www.Prussia.us
- General
- Posts: 1060
- Joined: Sun Jan 06, 2008 7:17 pm
Re: Michael J's build #2
Michael,
You seriously do not have a template for the ventilation holes?
If nobody can hook you up with a computer drawing let me know, I can at least trace mine, it will be ghetto-basically paper with a pen outline and vent holes traced but at least you will have something to go on, you have come this far do not get into a rush to “just finish” the ventilation holes add a lot of character…..
“… corporations have been enthroned, and an era of corruption in high places will follow, … until all wealth is aggregated in a few hands and the Republic is destroyed.”
- Abraham Lincoln (Republican), Nov. 21, 1864
- Abraham Lincoln (Republican), Nov. 21, 1864
-
Michael J
Re: Michael J's build #2
www.Prussia.us wrote:Michael,
You seriously do not have a template for the ventilation holes?
If nobody can hook you up with a computer drawing let me know, I can at least trace mine, it will be ghetto-basically paper with a pen outline and vent holes traced but at least you will have something to go on, you have come this far do not get into a rush to “just finish” the ventilation holes add a lot of character…..
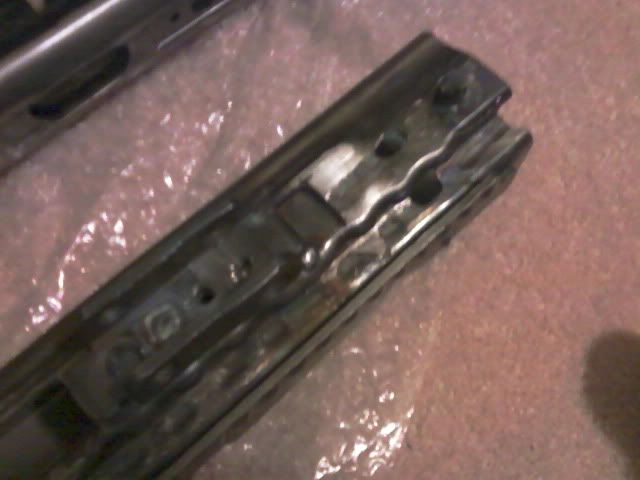
Our milling machines suck here... The zero tends to move, so when i was cutting my vent holes, thay all came out slightly diagonal! I plan to clean them up with a file though, so that they don't look too horrific

Re: Michael J's build #2
The D holes also serve to locate the rails fore and aft-that is why there is a flat side.That is important. ---bil
"I dream of a world where I can buy alcohol,tobacco and firearms from the same drive-up window,and use them all on the way home from work!" Dogbert
-
www.Prussia.us
- General
- Posts: 1060
- Joined: Sun Jan 06, 2008 7:17 pm
Re: Michael J's build #2
Michael,
My technical knowledge of the names of this stuff is poor so I simplify everything, but yes any remaining holes on the receiver shroud and rear, is what I was referring to. The oblong regular shroud holes look good that you cut, but as BIL noted (and I am sure you know) the D-holes for aligning the rails have to be true..
My technical knowledge of the names of this stuff is poor
“… corporations have been enthroned, and an era of corruption in high places will follow, … until all wealth is aggregated in a few hands and the Republic is destroyed.”
- Abraham Lincoln (Republican), Nov. 21, 1864
- Abraham Lincoln (Republican), Nov. 21, 1864
-
Michael J
Re: Michael J's build #2
I don't quite understand the purpose of the D-holes , fore and aft ? What does this mean, will it make a massive difference? I only through the D-holes were so you didnt put the rails in backwards or something, i am not familiar with the above terms, did i royally mess up or something ?
-
www.Prussia.us
- General
- Posts: 1060
- Joined: Sun Jan 06, 2008 7:17 pm
Re: Michael J's build #2
Michael,
It looks like you are doing a storming-good job, I was just making sure you had the hole templates or something to work from, which you do. Also you have your rails, if they fit in the hole, and the side facing aft is perpendicular with the bottom of the receiver, helping to keep the rails aligned, then all is well.
I was a total wuss, I used de-milled receivers, so believe me those holes look fine, far better than I could do with my dremel, I was just making sure you kept them true....
“… corporations have been enthroned, and an era of corruption in high places will follow, … until all wealth is aggregated in a few hands and the Republic is destroyed.”
- Abraham Lincoln (Republican), Nov. 21, 1864
- Abraham Lincoln (Republican), Nov. 21, 1864