I have a Coldsteel 80% receiver and the M53 parts kit. I made measurements and now need to determine where to make the cuts to the two receiver parts to form the joint between old and new. I could leave the coldsteel at the current length and cut the old receiver to length, or cut both and place the joint at where it would be the best point as far as loading (stress) an ease of welding. My first thought was a point right behind the front sight mounting.
Also weld the barrel bushing before or after the welding of the two receiver parts?
Any sugestions?
Coldsteel 80% receiver and 53M kit
-
kusojijii
I am in your same situation and I may be very wrong but this is what I was planning on doing. I was going to cut just behind the rear sight forward the notches for the trunion since it seems like the only place in the area where you can get an acurate measurement, it looks like the cold steel camming section has a lot of material in front of the trunion notches to accomodate cutting there. As far as strength I have no idea. I do believe you ned to affix the camming section first so you can set the correct depth of the front bushing.
but like I said, I am new and could be WAAAYYYY off. This is just what I gather from reading so far.
but like I said, I am new and could be WAAAYYYY off. This is just what I gather from reading so far.
-
waffendude

- Stabshauptmann

- Posts: 236
- Joined: Thu Oct 26, 2006 8:33 pm
- Location: ohio
heres what i did
1. welded up the back part of the rece
2.welded my "cmming section" of the rece to my shrould -just behind my frt sight---cleaned out slag and excess weld
3.welded my "shrould/camming section" to my rear rece
4. welded my frt bearing to the correct length
not sure if this is the best way--but its the way i did it
good luck
waffen
-
robertmcw
We did an Angola 3 cut and installed the rails before finishing the welding - BIG MISTAKE. When we did the finish welds the rear piece warped. We had to remove it and reweld it and with the rails installed that was difficult. I think you are much better off getting all the pieces welded up and straight to your satisfaction before installing the rails. Just my two cents.

If you are doing a cut-up rear receiver,the way I found that works is in Pirates build,use a piece of steel backed by thin copper,drilled for the rail holes and bolted in.It holds everything in place,is not as likely to twist as the rails,and then you unbolt it to clean up the welds inside.I would also do as you said,save the bushing for last,as you can adjust length with it. ---bil
-
Karbinator
I've never held the CS section, but It seems that
the rails, and cam w/windows need to be fit to the rear
CS section first. Then you know where to place it on
your front shroud section. If you do it the other way
around the rails may end up sitting to far back, and into
the buffer section, and you wouldn't be able to the the stock
inside...let alone having to punch rivet holes Offset from the dimples
on the CS section.
But then Again, I've never seen the section but in pictures.
The CS 80% receiver is 18" in length and goes past the trunnion/camming holes. The rails would stop at this location and line up with the cams that stick thru the holes (windows). I checked the location of these two holes (windows) on the CS receiver and they were in the correct location. Right now I am leaning toward getting new rails because the old rails have the holes in them and trying to line the holes up with new holes drilled in the receiver seems like it would be difficult. The new rails you would just clamp the rails into proper location drill and rivet.
-
nutsrusted
Here's what I'm thinking. First, I will attach the barrel bushing. I'm going to use camming section dimensions to determine how much to trim off the ColdSteel receiver. Exact trim size seems unimportant at this point. Bolt the two halves to a base as described in the Pirate tutorial. Adjust the location of the halves to match the dimensions per the print. I would temporarily mount the rails, barrel and camming piece and use the alignment tool to line up all three. I would then see if the other receiver surfaces match the dimensions using a height gage, surface plate, calipers, ect. At this point you might tack the receiver together and locate the rail bolt holes, and test fit some of the other parts.
Bottom line is I don't think you can treat it like a torch cut receiver and just line the receiver parts back up and weld. I've never done this before so take this for what it's worth - not much.
Bottom line is I don't think you can treat it like a torch cut receiver and just line the receiver parts back up and weld. I've never done this before so take this for what it's worth - not much.
-
RaccoonRough
-
woodco
-
MGW LLC
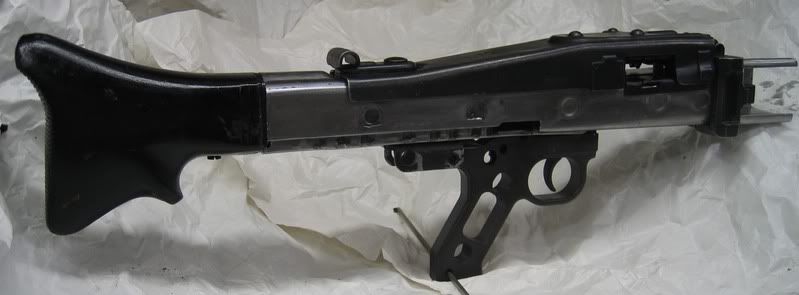
After several evening this past week I have gotten this far. Everything is just fitted and not welded/riveted at this time.
This view shows what I have fitted to the receiver so far.
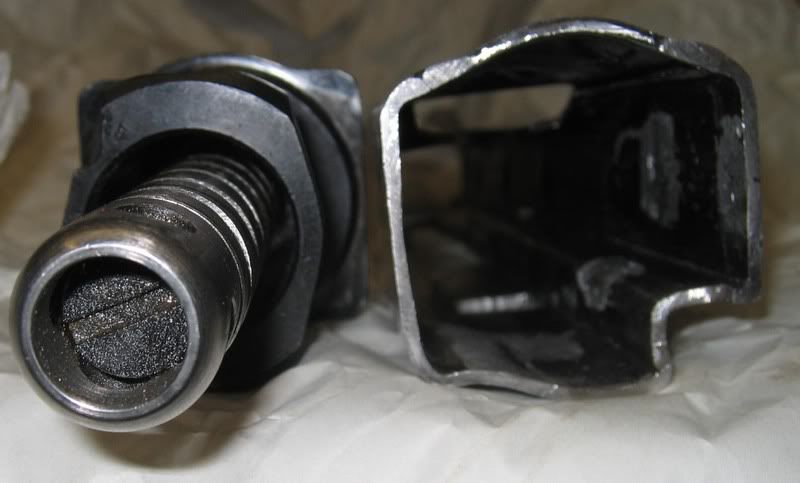
The CS 80% receiver has had some issues. Below the buffer would not slide into the end of the reciever. I ground clearance at the lug distance and at the end where the pilot diameter would not fit.
And this is a Weaponeer grip mounted. I had to cut the grip slot into the ejection port slot. Careful reveiw of the grip tang shows that this is the way it was designed to fit as shown in the second view
I also ran into problems with the feed slot being too high and not permitting the feed tray to site flat.
This view shows what I have fitted to the receiver so far.
The CS 80% receiver has had some issues. Below the buffer would not slide into the end of the reciever. I ground clearance at the lug distance and at the end where the pilot diameter would not fit.
And this is a Weaponeer grip mounted. I had to cut the grip slot into the ejection port slot. Careful reveiw of the grip tang shows that this is the way it was designed to fit as shown in the second view
I also ran into problems with the feed slot being too high and not permitting the feed tray to site flat.
Last edited by bolex on Sat May 05, 2007 7:19 pm, edited 1 time in total.
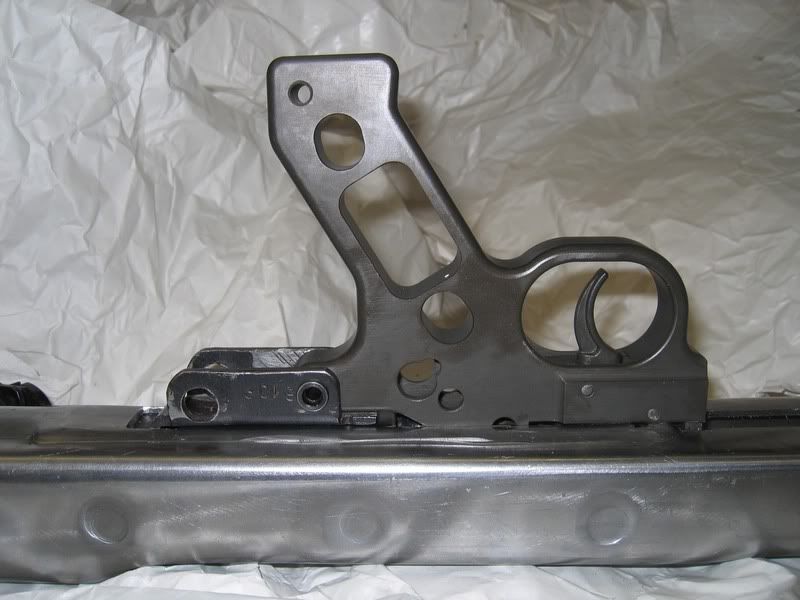
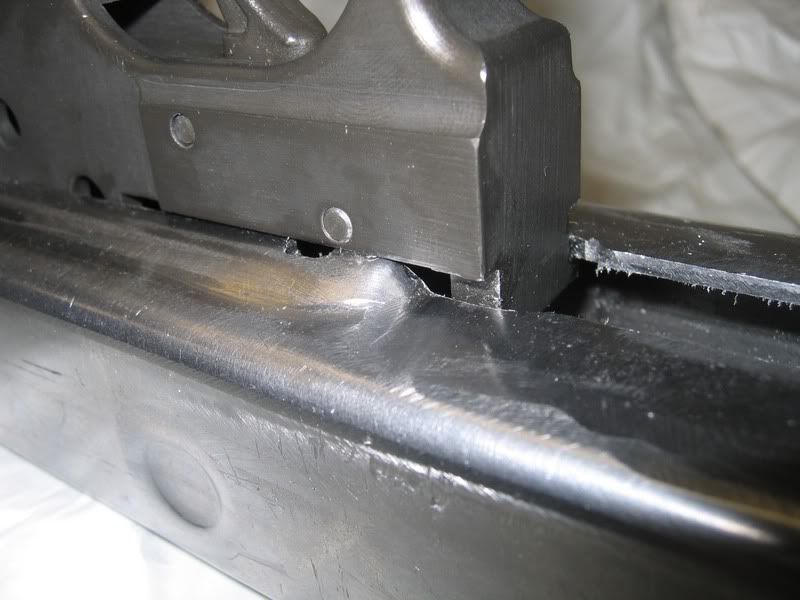
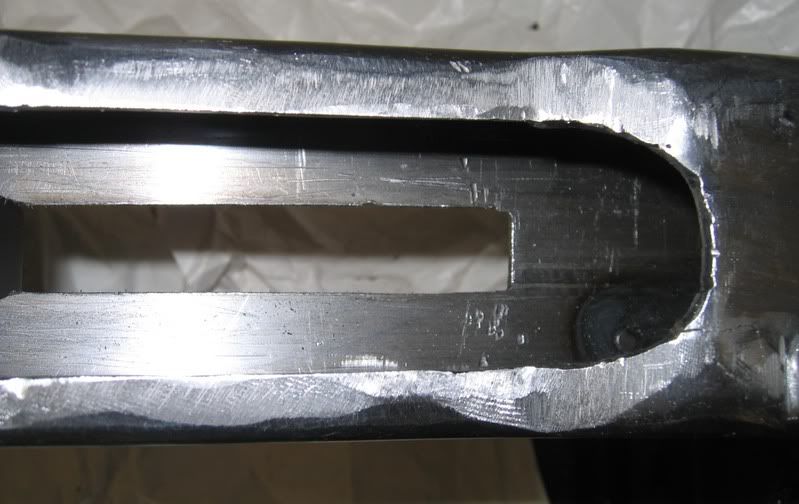
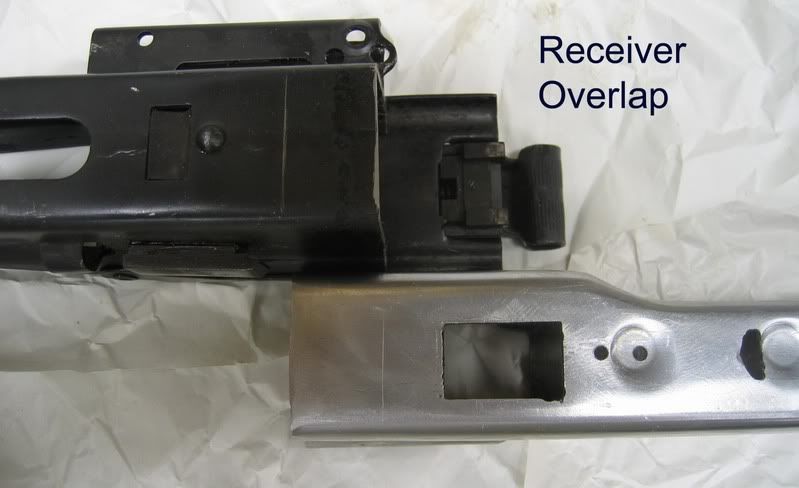
This is the receiver overlap that I have with the Yugo barrel guard. I removed just enough from the Yugo to get a clean and square suface. The Yugo had one of the cam slot surfaces left on it and I matched it with the cam surface on the CS. The cam surface hole were right on the money fore to aft and needed a little work to the width. I am intending to cut the CS receiver to get the receiver to the proper length.
-
propos
Great work Bolex! Keep at it and you will soon have a working SA42. You are learning that these gadgets aren't AK's. Lots of head scratching and ruminations on how to go about fixing this and that. It looks like you have a good handle on what you are doing.
Keep us posted with your build. We can always learn from the work of others. You may be the first guy to build an SA42 using a CS receiver.
Keep us posted with your build. We can always learn from the work of others. You may be the first guy to build an SA42 using a CS receiver.


Nice going, Bolex.
And thanks for posting photos of your progress so far. (That's some nice, precise photography, too )
)
Your build will no doubt inspire a number of folks to jump into the deep water and get started on their own builds. (Myself included ) It would be cool to see a bunch of builds going on at the same time.
Keep posting photos of your progress. Might make a great tutorial or stickie on building the new receiver sections from CS and Wiselite.
Keep up the good work.
GeeDeeEmm
And thanks for posting photos of your progress so far. (That's some nice, precise photography, too
Your build will no doubt inspire a number of folks to jump into the deep water and get started on their own builds. (Myself included
Keep posting photos of your progress. Might make a great tutorial or stickie on building the new receiver sections from CS and Wiselite.
Keep up the good work.
GeeDeeEmm
" The strongest reason for the people to retain the right to keep and bear arms is, as a last resort, to protect themselves against tyranny in government . . . . When the people fear their government there is tyranny, when the government fear the people, there is liberty." Thomas Jefferson
-
RaccoonRough
-
nutsrusted
Bolex-your project looks great! On the top and bottom of the original receivers there is a small protrusion that helps locate the camming piece.When you get the location finalized.you ncould add these with small metal tabs.I believe these are to locate the piece,and also help stabilize it in use.They hold the piece in front,and the larger holes locate it side-to side. Nice progress,thanks for the photos. ---bil
Agreed, I already scribed the location of the camming "trunion" to line up with the rails. I figure two pads, one top and one bottom should keep the cam pieces level (parallel or in line with the rails. The camming piece has witness marks where it was hitting these on the original receiver, so the location and size is known.Bil wrote:Bolex-your project looks great! On the top and bottom of the original receivers there is a small protrusion that helps locate the camming piece.When you get the location finalized.you ncould add these with small metal tabs.I believe these are to locate the piece,and also help stabilize it in use.They hold the piece in front,and the larger holes locate it side-to side. Nice progress,thanks for the photos. ---bil