The Recuperator

The #1 place for MG42 answers.
User avatar
drooling idiot
General
General
Posts: 1495
Joined: Sat Mar 12, 2005 10:30 am
Location: Philla ,PA

The Recuperator

Post by drooling idiot »

What is it ?
Its a very important part of the gun that is probably the most confusing part in your kit.

What does it do ?
It pushes the barrel forward after the gun has been fired. This returns the barrel to its forward position , ready to fire again.

Where does it go ?
It sits in the bottom of the receiver with the long tube part facing towards the barrel on the left side viewed from the rear of the firearm.(cocking handle would be on right side).
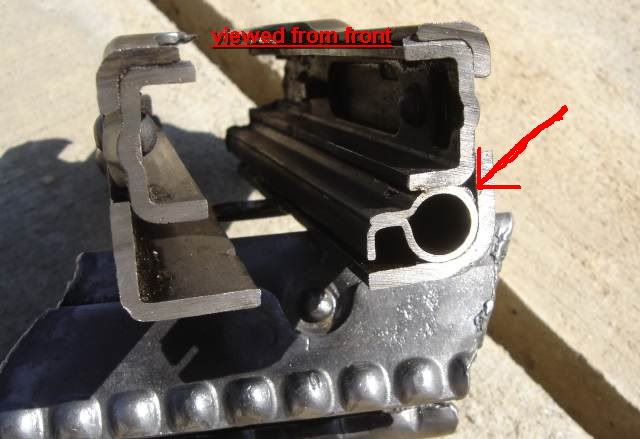
Image

How does it attach ?
There are two bolts used to mount the recuperator to the receiver.
The first is a normal looking bolt that has small flats on its underside of its head. This bolt is used in the rear rectangular opening of the recuperator body. It protrudes out the bottom of the receiver behind the gripstick mounting pin and is secured by a 10-32 nut with a diameter of 9MM.
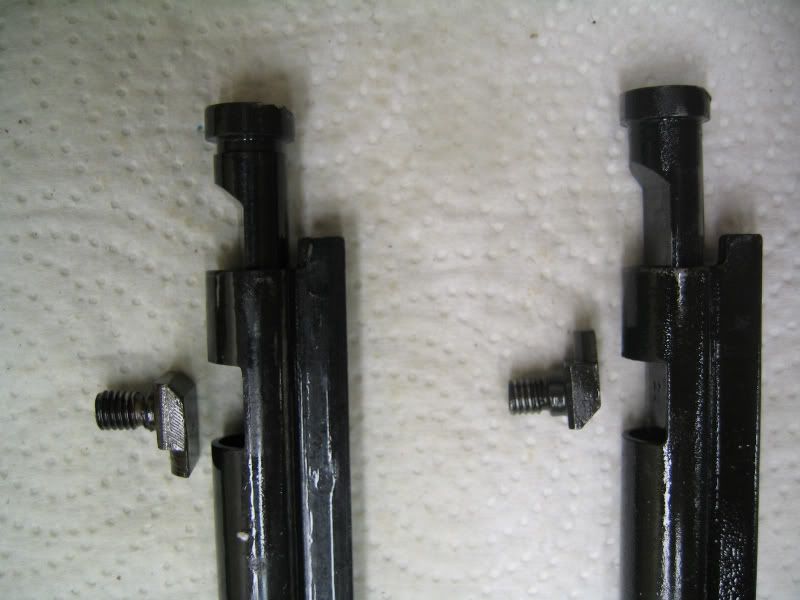
The second bolt is very unusual in appearance , it has a head with a long and short side. this head fits into the opening on the tube of the recuperator to secure the barrel plunger in to the tube against the spring pressure. The threaded part of this " T " bolt protrudes through the left side of receiver just behind the camming piece where its secured by a 10-32 nut with a diameter of 9MM on the outside.
pictures of these bolts are available below
[ CHECK FOR WELD BUILD UP IN THE CAM AREA BINDING THE PLUNGER BEFORE INSTALLING RECUPERATOR


What are the different types ?
Well , the obvious two are the original " MG42/M53 type " without a tail after the rear section and the latter " MG3 type " with the tail.
The less obvious are small differences in spring strength and shape of barrel plunger head.

Are they compatible ?
YES and NO, There are no real differences between an MG42 recuperator and a M53 Yugo recuperator. The reports to date so far say people are having good results from whatever recuperator they received with their kit ( 8MM or .308) as long as it is assembled right and in decent condition from the start.
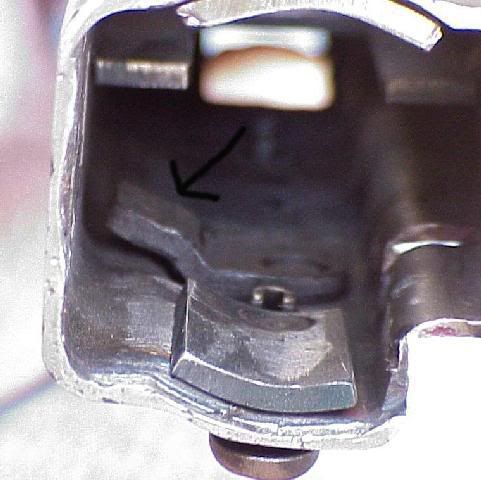
On the other hand the tail of the MG3 type has definite clearance issues with a MG42 unmodified receiver, and the MG42 style buffer. (click to go to buffer stickie.) .
Image
Arrow points to tab that needs to be removed to install MG3 recuperator.
Tab is part of the gripstick mount which is riveted just in front of the buffer lock cams . Aproximately .60" gap between the two.


How does that front nut get installed again ?
:lol: With the long leg facing towards the butt-stock when the recuperator is in the gun.
shown the correct way on the left side in this picture.
Image

How many pieces should i have ?
  • 14 total
    1) the main sheetmetal body
    2) 1 short rod
    3) 2 long rods
    4) 1 barrel plunger rod
    5) 1 spring (slightly shorter)
    6) 3 springs (same size)
    7) 3 keeper washers
    8 ) long and short attaching bolts with nuts (1 each)
How do i assemble it ?
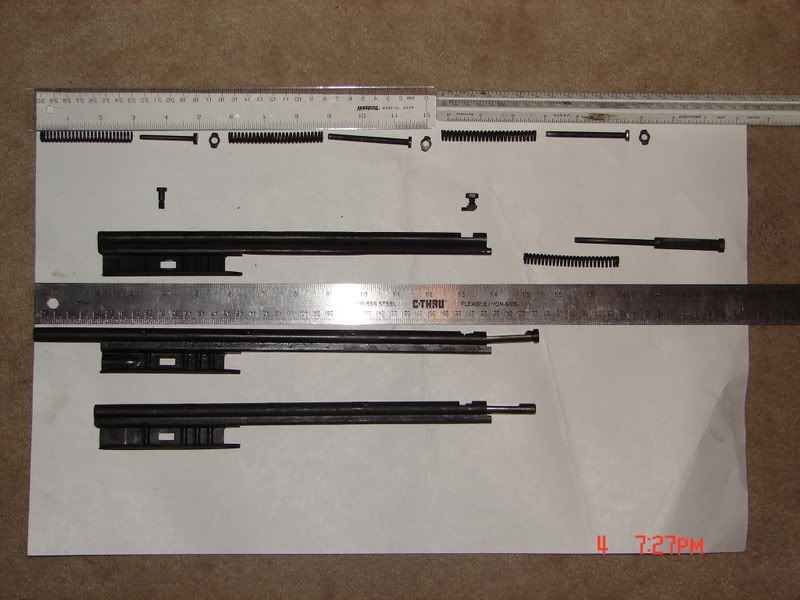
the following picture shows the parts lay-ed out in order they go into the tube.
Start with the small spring , then the small rod , then a keeper .
Image
BE CAREFUL THE SPRINGS ARE DANGEROUS WHEN COMPRESSED
assembling the part is not easy to do and will require, 3 hands , two sets of safety glasses and several small screwdrivers as well as some cursing. :oops:
Last edited by drooling idiot on Sun Apr 22, 2007 5:00 pm, edited 10 times in total.
"good , bad, .....I'm the man with the gun."

Its amazing anything works right around here with a bunch of
over-age juvenile delinquents running the place.
User avatar
drooling idiot
General
General
Posts: 1495
Joined: Sat Mar 12, 2005 10:30 am
Location: Philla ,PA

Post by drooling idiot »

What modifications are required to convert the recuperator to work in a semi-auto mg42 ?

The semi-auto mg42 is required to have a block permanently installed in the receiver that prevents the use of a unmodified full-auto bolt carrier. This block requires the removal of the sear catch lugs on the underside of the full-auto bolt to clear the bolt block. This requires the recuperator to be cut to fit around the FA bolt block.
Click here for more info on the bolt.

The cocking handle in a full-auto grips the sear catch lugs on the bolt carrier to charge the gun. In a semi, with the lugs removed, it is necessary to weld a tab to the right side of the bolt carrier to substitute as the original sear catch lugs for the cocking handle. This cocking tab needs enough space to be able to retract and charge the gun for firing.

It is usually required that the recuperator have the right side vertical ledge removed for this cocking " sail panel '' that you've welded to the bolt-carrier's right side .
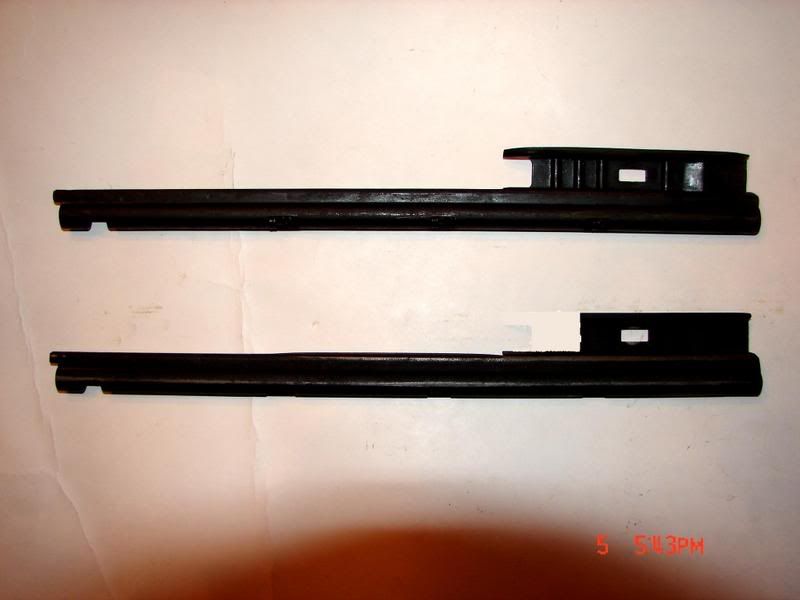
typically the recuperator is also cut back to the second rib to make room for the FA bolt block.
Image

picture shows unmodified on top and semi-auto on bottom
Last edited by drooling idiot on Mon Oct 16, 2006 6:46 pm, edited 2 times in total.
"good , bad, .....I'm the man with the gun."

Its amazing anything works right around here with a bunch of
over-age juvenile delinquents running the place.
Abwehr

Recuperator

Post by Abwehr »

Drooling,

A great posting on the Recuperator, you have done a marvelous job! You are correct that this is the most misunderstood part on the gun and this post has definetly been needed.

One suggestion that may help; the two bolts that lock the Recuperator in place are always getting folks confused. Could you post a closer view of each locking screw screw?

Thanks for the work on this!!!
User avatar
drooling idiot
General
General
Posts: 1495
Joined: Sat Mar 12, 2005 10:30 am
Location: Philla ,PA

Post by drooling idiot »

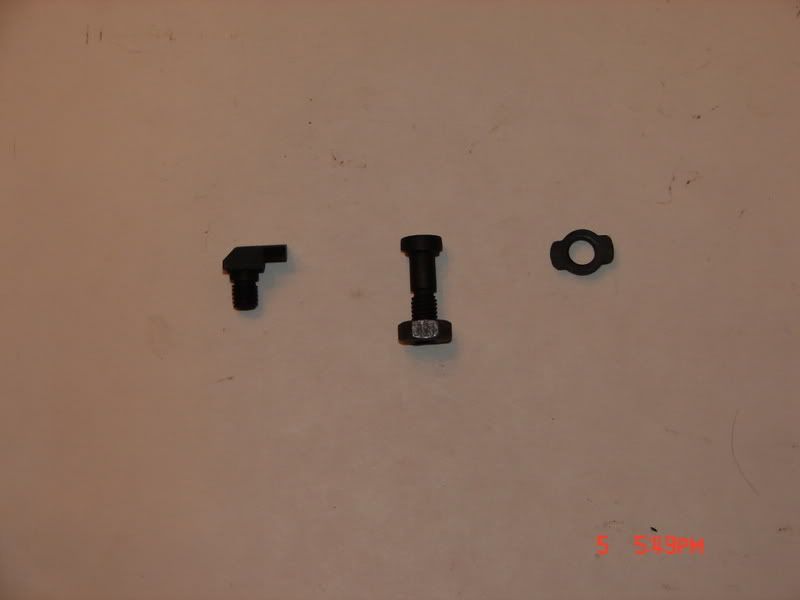
OK , here is a close up view of the small parts so often missing from kits.
from left to right you have,
  • 1) The front " T " bolt (shown without nut)
    2) the rear bolt ( note the small flats under head where it grips recuperator body) (shown with nut attached)
    3) spring keeper washer ( one of three)
Image
Last edited by drooling idiot on Mon Oct 16, 2006 6:48 pm, edited 1 time in total.
"good , bad, .....I'm the man with the gun."

Its amazing anything works right around here with a bunch of
over-age juvenile delinquents running the place.
User avatar
drooling idiot
General
General
Posts: 1495
Joined: Sat Mar 12, 2005 10:30 am
Location: Philla ,PA

Post by drooling idiot »

some extra pictures

a close up of a MG3 recuperator, note the "tail"
Image

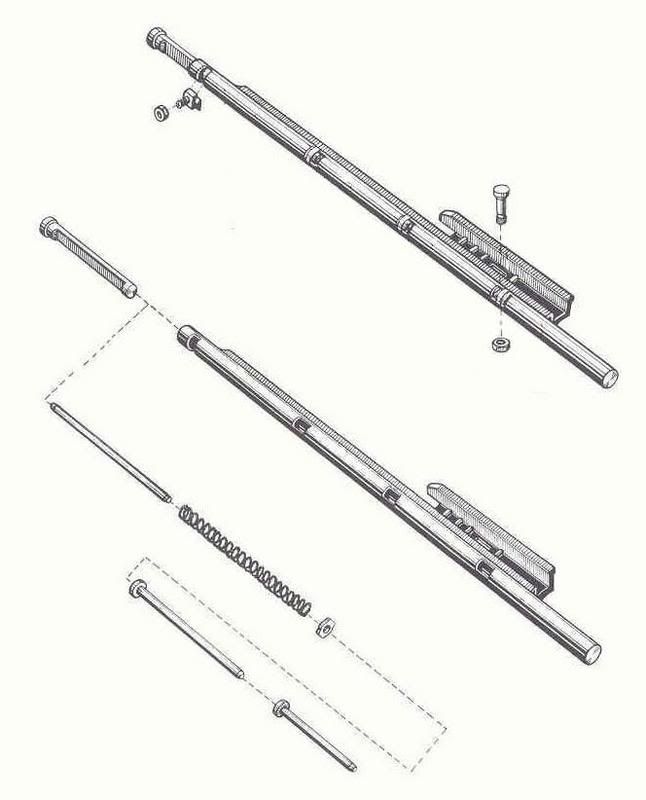
a diagram of a MG3 recuperator that doesn't show a detailed correct assembly of the springs.
Image

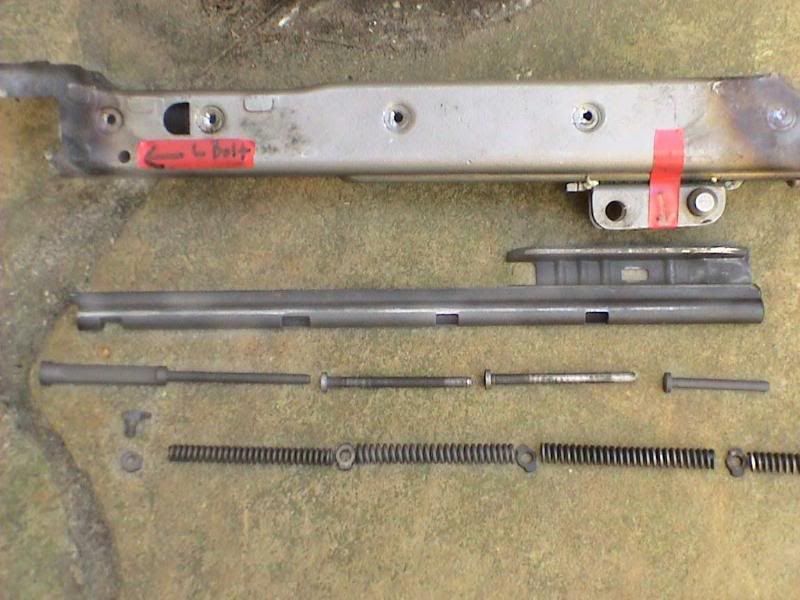
a members picture showing the MG42 recuperator ( NO TAIL ) layed out beside a rear receiver section . red tape shows aproximate mounting points.
Image
Last edited by drooling idiot on Mon Oct 16, 2006 6:58 pm, edited 3 times in total.
"good , bad, .....I'm the man with the gun."

Its amazing anything works right around here with a bunch of
over-age juvenile delinquents running the place.
User avatar
M1 Tanker
Oberst
Oberst
Posts: 522
Joined: Wed Jun 22, 2005 12:23 am
Location: VA

Post by M1 Tanker »

Does anyone have a guide on tricks to disassemble it? I can't seem to seperate the spring from the spring keepers to take the thing apart.
User avatar
drooling idiot
General
General
Posts: 1495
Joined: Sat Mar 12, 2005 10:30 am
Location: Philla ,PA

Post by drooling idiot »

EYE PROTECTION STRONGLY ADVISED

To disassemble the recuperator try a small flat bladed screwdriver and a pair of needle nose pliers.

starting at the top
insert screwdriver between keeper and head of plunger,
push down on the plunger compressing the spring
the retainer should have some freedom of movement once released from the spring tension.
quickly grasp retainer with needle nose pliers and rotate 90 degrees

the retainer should be holding the plunger down under pressure at this point.
you can either pull the retainer out through the "window" of the recuperator or
compress the recuperator assembly by inserting a probe rod into it , this will help align the retainer in the "window" better and make it easier to pull out .

CAUTION , when the retainer is removed the pressure of the spring and guide rod will be released . hold the probe rod firmly .
"good , bad, .....I'm the man with the gun."

Its amazing anything works right around here with a bunch of
over-age juvenile delinquents running the place.
Demontrooper
Oberstleutnant
Oberstleutnant
Posts: 476
Joined: Fri Sep 08, 2006 10:52 am
Location: The Greatest Empire the World Has Ever Known

Post by Demontrooper »

Thanks for this awesome info!
fal lover

Post by fal lover »

yes ,thank you very much :D
cz2
Oberleutnant
Oberleutnant
Posts: 118
Joined: Sun Mar 11, 2007 1:55 pm
Location: colorado

Post by cz2 »

THANKS, Recuperator questions answered,great info.
cz2. :D
All glory is fleeting.
Abominog
Major
Major
Posts: 314
Joined: Tue Apr 05, 2005 1:03 pm

Post by Abominog »

I just figured out how to assemble the recuperator.

You'll want:
bore cleaning rod long enough to reach end of recuperator
long needle nose pliers


First, note that the first-in plunger & spring are shorter than the others.
Second, be sure you know how to get a keeper in. Practice with just the keeper (no spring pressures). It will become obvious that it has to be put in "sideways" and rotated.


Put the shorter plunger/spring in and push all the way to the rear using the cleaning rod.

Push hard on the rod to compress spring so that the plunger head is about flush with the end of the cutout window.

With your fingers, push a keeper in sideways, pushing the rod to the side (but keep it there, and keep the pressure on!)

Remove the cleaning rod. The keeper will remain in the cutout window, albeit at the wrong angle.

Grasp the tab on the keeper with needle nose pliers. Push the cleaning rod back down the recuperator body and apply pressure to the side of the keeper. Simply twist the keeper and it will pop into place.

Bingo! There you go. Repeat.
FNG
Bil
Field Marshal
Field Marshal
Posts: 4873
Joined: Sun Nov 26, 2006 10:21 pm
Location: Brookline,VT

Post by Bil »

Thanks for this info-it will save some time and eyes!! :D ---bil
bolex
Stabshauptmann
Stabshauptmann
Posts: 298
Joined: Thu Apr 12, 2007 2:25 pm
Location: Mississippi

Re: The Recuperator

Post by bolex »

I got a Yugo kit and was missing this rod shown in picture. How long is it?
Image

Update, Centerfire sent the Yugo kit I ordered in Feb and it had a complete Recuperator. The missing rod is 62.9 mm (2.477") long and 3.95mm (.155") diameter.
Last edited by bolex on Wed Jun 27, 2007 9:08 pm, edited 2 times in total.
User avatar
flemgunner
Brigadegeneral
Brigadegeneral
Posts: 635
Joined: Sat Apr 21, 2007 6:35 am
Location: Texas
Contact:

Re: The Recuperator

Post by flemgunner »

I have a yugo kit as well. It differs from the pic they show above but the first (what Im calling) "spring guide" is the direct sub for that part. You should have 3 of those "spring guides" and the 3 retainers to hold em.
BTW I pushed the guides down and then used safety wire to keep tension on the spring. The retainers just came right out. After removing the retainers I just cut the wire (holding tension on the spring) and slowly let off tension till the spring was loose. worked great!
Glenn
railsplitter

Re: The Recuperator

Post by railsplitter »

My Wise lite build (not quite done yet) but the barrel installation seems to bind on the recouperator instead of pushing it back against its springs. Do I need to apply more force when putting the barrel in place or add lubrication? Is there a measurement I can check to see if the end of the recoupe is in the right postion (fully forward)? The rails are in and flush against the camming section. :?
Bil
Field Marshal
Field Marshal
Posts: 4873
Joined: Sun Nov 26, 2006 10:21 pm
Location: Brookline,VT

Re: The Recuperator

Post by Bil »

Make sure there isn't anything else keeping the barrel from seating.I had a problem with mine and it turned out to be a bit of weld not ground down enough inside. ---bil
"I dream of a world where I can buy alcohol,tobacco and firearms from the same drive-up window,and use them all on the way home from work!" Dogbert
machinegunbob

Re: The Recuperator

Post by machinegunbob »

Railsplitter - Mine did the same thing. Be REAL SURE that the forward nut has not been installed backward. I did that one time. It allows that end piece (the one that touches the barrel) to sit too far foreward to allow the barrel to slide in. So, first, take the recoup out. If the foreward bolt is in backwards, just rotate it 90 degrees, and re-install it. You can
( I did) grind a little extra lead so the barrel pops in easier. Just do a little. That piece does not engage the barrel on a very large area to begin with. Plus, re-engeneering something that already works is not real good to try. I'll bet you've installed that forward bolt backwards (look at the above picture that someone posted). Always wear safety glasses when playing with springs. Blind dudes shooting belt-feds is really scary stuff!
MGB
railsplitter

Re: The Recuperator

Post by railsplitter »

I reinstalled the recoup a few times and applied a little force in closing the gate - works fine. Always have issues being timid around semi auto firearms. Springs that close bolts need to move with authority not slowly or feed issues occur
zb-30
Obergefreiter
Obergefreiter
Posts: 19
Joined: Sun Nov 06, 2005 11:15 pm
Location: Virginia

Re: The Recuperator

Post by zb-30 »

Can a Mg3 recuperator be used in a Wise lite semi auto receiver since they are longer in the buffer area?

A regular recuperator rest against the tab that is part of the grip stick mount, but doesn't the MG3 recuperator rest against the buffer? If the wise lite receiver is longer in the buffer area I guess there would be a gap between the recuperator and buffer, which is probably not a good thing.

I'm just starting to learn all this MG-42 stuff, so can someone confirm or deny my suspicions?
Bil
Field Marshal
Field Marshal
Posts: 4873
Joined: Sun Nov 26, 2006 10:21 pm
Location: Brookline,VT

Re: The Recuperator

Post by Bil »

The recouperator mounts with a bolt through the side,and one through the bottom.The extra length shouldn't affect these fixed mounting points.The front of the recoup remains in the exact spot in relation to the barrel. ---bil
"I dream of a world where I can buy alcohol,tobacco and firearms from the same drive-up window,and use them all on the way home from work!" Dogbert
Post Reply