Page 1 of 3
Jon's Build
Posted: Mon Dec 01, 2008 11:10 pm
by MrJD
Well, I just ordered my Kit from the "for sale" board here. Tomorrow I plan to order a receiver from IMA. I plan to call Project guns and order the camming receiver section also.
I would like to get a new ratchet plate and new bolt guide rails also. I figure I can use these to line up the receiver pieces for welding a little better. Where is the best place to look that already has these parts with the rivet holes drilled and ready? Also, are any other receiver pieces missing (from the IMA units) that I should look out for?
Also, I figure while I am ordering, I will go ahead and order three or four belts also. I plan on running this thing as 8mm, so I need 8mm belts. I think I remember seeing some at IMA, but are theirs the best for the price? And you need starting tabs also with the belts right?
I plan on using this thread as my build thread for future members, so stay tuned for pictures when everything comes in.
Thanks.
Jon
Re: Jon's Build
Posted: Mon Dec 01, 2008 11:42 pm
by oakrodent
Congrats on starting your build. You should buy new rails, they have more material than originals. Also they have not been cut off of an old receiver that has a million rounds threw it. You can always drill new holes in the new rails. I have assembled a few from cut up receivers. Going with new rails and ratchet plate is by far the way to go. It helps line everything up. I also install the recoup to help align the receiver and the left rail. Just be careful not to weld the recoup to the receiver. BRP has all the parts you need. Brain with BRP is a super nice guy and treats every customer like a big deal. His help was indispensable with my first build. You will need a filler piece for the front of the receiver to the trunnion area. I thought I saw some for sale here on the message board. The chains are a hit or miss item. The last time I look Sarco had a good deal on them. You realy don't need the starter tabs. If this is your first chain gun, I would stay away from them for now until you get comforable with it and no longer need to lift the feed cover to load a new chain.
Again good luck with your build
Re: Jon's Build
Posted: Tue Dec 02, 2008 6:06 pm
by MrJD
Called Project guns today. They are out of camming sections, but said they will be getting more in. Where can I look for rails and a ratchet plate? The only ratchet plate I have seen is $50. that the only one?
Re: Jon's Build
Posted: Tue Dec 09, 2008 4:53 pm
by MrJD
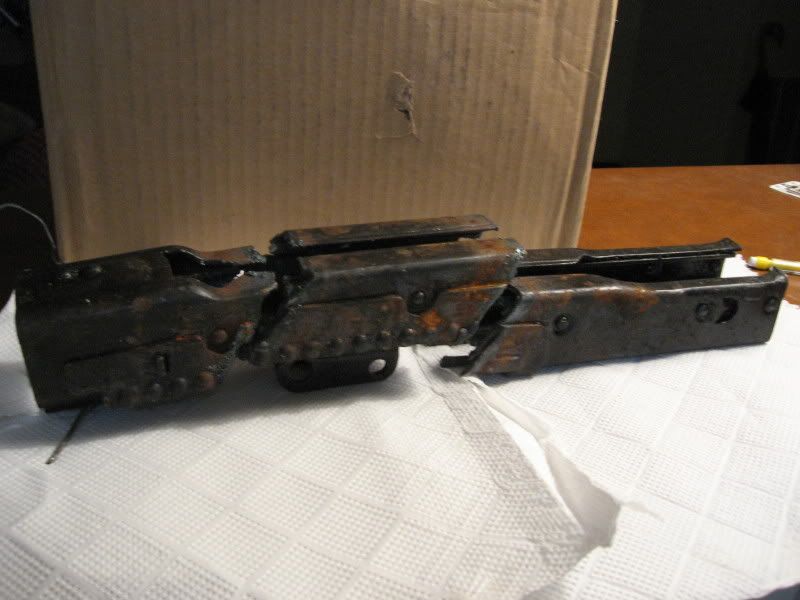
Receiver came in from IMA.
Looks like most of the camming piece is there.
So from what I can tell, this one was made in 1944 by Gustloff-Werke. But what does the ARZ code indicate?
I'm really excited to get home to see my kit i bought on here. If not much metal is missing, I believe a guy on here is selling the metal I need. Also, the ratchet plate looks pretty good, so I will likely just build the missing area with some spare sheet metal and shape everything up with the welder.

Re: Jon's Build
Posted: Mon Dec 29, 2008 11:47 am
by fredieusa
Re: Jon's Build
Posted: Mon Dec 29, 2008 9:00 pm
by www.Prussia.us
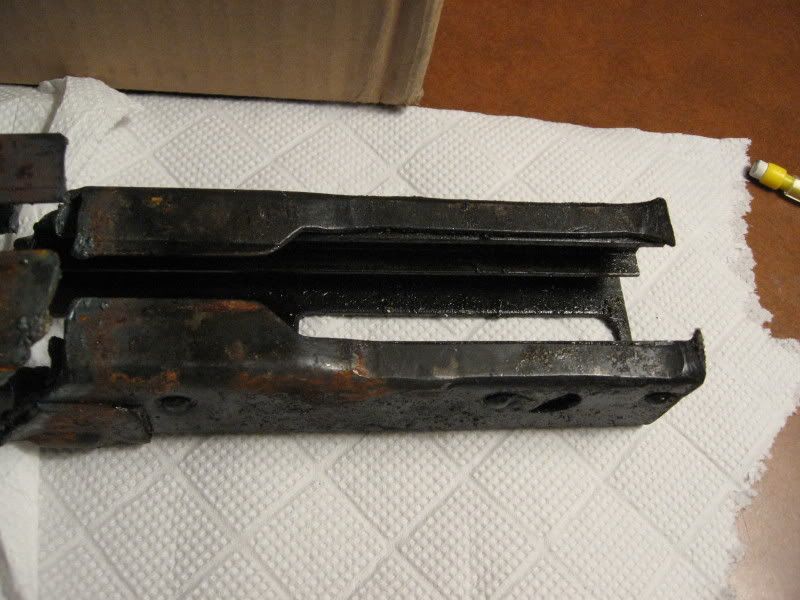
Looks like a nice start, as many builders know well the part that may be short is where the camming section ramps-up (from its indentation that holds the feedtray) going down the receiver. Depending on the shroud you get with your parts kit, you will likely need a little filler piece there, this is pretty common. However you may get lucky and get an older de-mill that had more meat on it?????
Robertrtg is great and I have to echo Oakrodent, Brian at BRP has the patience of Job.
Re: Jon's Build
Posted: Mon Dec 29, 2008 10:24 pm
by oakrodent
MrJD I really can stress how you will want to change out your ratchet plate. Just removing it make welding the receiver so much easier. It is nearly impossible to correctly reproduce the dimples on the ratchet plate. Even when I nick one with one of my roll lock disks I curse my self for most of the day because I think it stick out like a sore thumb. I hate to see somebody build a really nice MG-42 and have a sore spot on it that could have been easily corrected. It like trying to us finger nail polish to cover up a bad paint scratch on a Ferrari. Doesn't look so good.

Any ways good luck with your new toy and ask any questions you may have with your build.
Re: Jon's Build
Posted: Mon Dec 29, 2008 11:31 pm
by MrJD
I have all the parts and kit set up and ready for the build. And yes, I am short of some metal around the camming section. I need about an inch and a half I suppose. Being that i cant seem to get one from project guns (great guys though. I have delt with them on other parts.) I will likely just try and fab the area up myself. And i hear you on the ratchet plate. Being that I've never built one of these, I might buy a new one and I might not. I have a good many leftover extra parts (rails, trunnion(camming piece, original grip retainer, and some extras I am likely forgetting.) so I might just try and trade for a new plate.
This really does not worry me. what worries me is the front bushing... this just does not look like a $125 part. Once I finish the milled AK build I am working on currently I am going to build a KP44. After that I am going to start work on the MG42. So, once I cross that road, I will figure out what I'll do. either way, I will try and take some pics to show the rest of the kit sometime next week.
Jon
Re: Jon's Build
Posted: Wed Dec 31, 2008 1:32 pm
by ChrisPCook
Belts are cheapest from MG34.com.
I am going with building back up the ratchet plate. I'm using pieces of keystock ground down to fit in the gaps where the ratchet plate it. (thicker pieces where the ratchet plate is, thinner pieces for the other torch cut gaps. I'll build up the dimples and then spend some time with a dremel tool and small file to shape them properly. I cut pieces of copper strips and basically "sandwiched" it in between the rail and the receiver, rail rivets were drilled out with a large bit, easy enough with the press. Took them down, most of the time they start to "spin" when the rivet is broke through, simple matter at that point to punch them out.
Then I just screwed in my rails as a "jig", thin copper strips were cut with my dremel tool to back up the welds and anchored in by the screwed in rails.... I put a large bar of metal keystock in the recess for the charging handle, will use this with a metal plate on the topside to keep everything together while welding, I'll "clamp" the area to be welded into my bench vise...
From Booster replacement is easy. Just follow the projectguns tutorial. After I had the slag ground down from the front end I was able to get the old booster bearing section "cock-eyed" in the front of the receiver, I then used a thick cutoff wheel on my dremel and cut through the old booster bearing, that relieved enough tension for me to pop out the old bearing section, took 20 minutes tops.....
I'll put pictures up when I have time. Right now not much daylight up here, and don't feel like tinkering with stuff out in the garage when it is 20 below!
Hope that helps, Chris....
Re: Jon's Build
Posted: Wed Dec 31, 2008 6:18 pm
by Michael J
MrJD wrote:This really does not worry me. what worries me is the front bushing... this just does not look like a $125 part. Once I finish the milled AK build I am working on currently I am going to build a KP44. After that I am going to start work on the MG42. So, once I cross that road, I will figure out what I'll do. either way, I will try and take some pics to show the rest of the kit sometime next week.
Jon
That stupid front bushing had me worried too. I finally broke down and bought it, and it is currently being shipped from APEX. Once i get a hold of it, i'll take some pics, and see if you figure you can make it, rather than having to buy one

. I didn't want to fool around with threading it on the lathe, as i don't know how. Other than that, it seems simple enough, but i'll find out once i get it.
Re: Jon's Build
Posted: Thu Jan 01, 2009 9:47 am
by Bil
There is much more to these than it would seem-the slots do not go all the way through,they are not all the same,and they set the booster position correctly so the barrel goes in the reght way.Unless you have the correct milling machinery and experiance,this is money well spent.If you do decide to make your own,be sure to post pics and results.It has been done,but as I remember,the builder came to the same conclusion. ---bil
Re: Jon's Build
Posted: Thu Jan 01, 2009 7:37 pm
by gdmoore28
Bil is right.
Do a search for posts on the bushing. It is a much-involved project doable only by those with the specialized equipment and skills. I enjoy making as many parts as I can, but the bushing is best left to experienced machinists.
After buying a couple and researching what is involved in building one, my opinion is that this is $150 well-spent.
GeeDeeEmm
Re: Jon's Build
Posted: Fri Jan 02, 2009 12:06 am
by MrJD
Yea, After taking a second look at it today, I don't quite know what I will do. Before I can post with any realism, however, I need to do a bit more research.
I took pics, but I had the camera on the wrong settings... and they all came out dark but these two which show the amount of material missing from the kit's camming section. Note, things are just gently placed together.
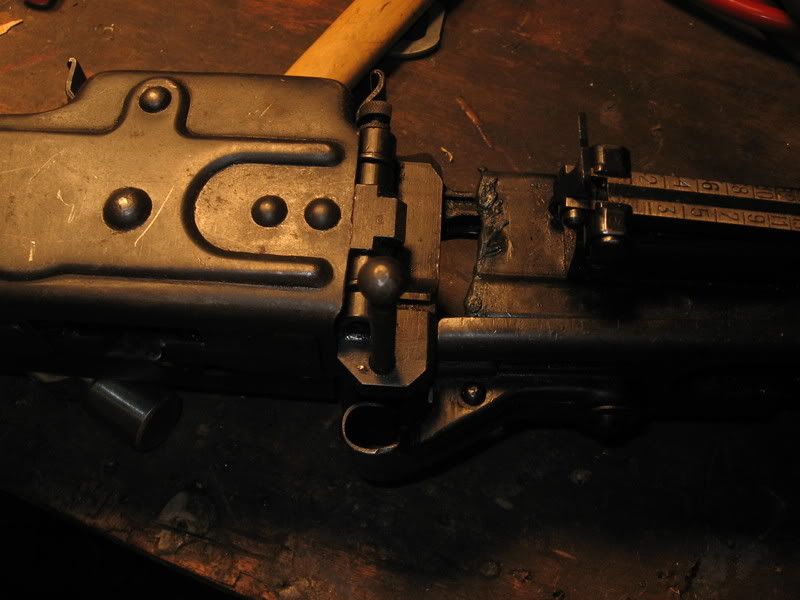
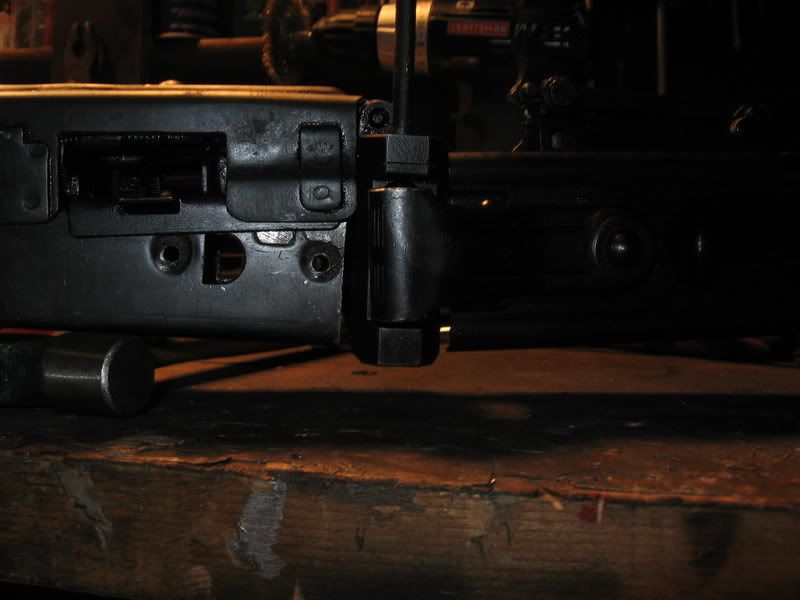
I ordered belts a while back from IMA and got them this week also. They are apparently unissued and are in Very nice shape. I obviously loaded one belt just to take a look at it... which is further exciting me about the project.
Re: Jon's Build
Posted: Mon Mar 30, 2009 3:28 am
by MrJD
A quick no pictures update:
I have connected the two halves of the receiver by building my own camming section out of four pieces of angled steel, and grinding accordingly. Everything seems to be spaced out well. Also, I have welded in the bolt block and started building the grip stick. Currently, it is stripped down and has had the front connecting section cut off to allow me to install the AR15 FCG. I have built and drilled two plates to hold the AR FCG. Hopefully next weekend I can weld them up and check function.
next steps: I have to suck it up and buy the front $140 piece, build everything to modify the bolt (wish I could find a cheap rear extension)... and modify the bolt, do a bit of file work here and there to make sure everything moves smoothly, and test fire it.
then, the hard part begins... cosmetics...
Re: Jon's Build
Posted: Mon Mar 30, 2009 3:07 pm
by rocco1911
You might want to look into the $75.00 barrel bushings from Brian @ BRP I have one & its alot better than the others available its an exact duplicate to the original one & 1/2 the price you wont be disapointed
Oh yeah he also sells the bolt extension & a F/P that you will be needing

Re: Jon's Build
Posted: Mon Mar 30, 2009 9:13 pm
by MrJD
Hrm, I was unaware of them at that price. Might have this thing together sooner rather than later.
thanks.
Re: Jon's Build
Posted: Fri Apr 03, 2009 7:32 am
by MrJD
question, I looked at the cheaper front bushings... they are made as a duplicate of the original design. Being that I had to hammer out the previous "original design" unit, how does one install this bushing? Does the receiver have to be cut open?
Re: Jon's Build
Posted: Fri Apr 03, 2009 7:57 am
by rocco1911
No it installs the same as a wiselite bushing...
Re: Jon's Build
Posted: Fri Apr 03, 2009 2:31 pm
by mattcdavis
Uh I may be wrong but the wiselite repair bushing is designed to slip into the reciever from the front and then be welded in place.
And the actuall front ends were inserted as the reciever was welded together and then they were also put in a hydraulic press and crimped? You could buy the $75.00 piece and lathe the back section off to slide it into the reciever or you would have to cut the reciever, bend it open, install the part and bend/weld back together? I looked at this long and hard as I was making my own repair piece ($0 budget build). Till I saw wiselites repair section I couldn't for the life of me figure out how I was going to get a new one in there! But after seeing the repair sections It was a no brainer! Please let me know if I have this wrong.
Re: Jon's Build
Posted: Fri Apr 03, 2009 2:42 pm
by MrJD
that is basically what I thought in terms of having to cut everything open... Did you successfully build your own bushing?